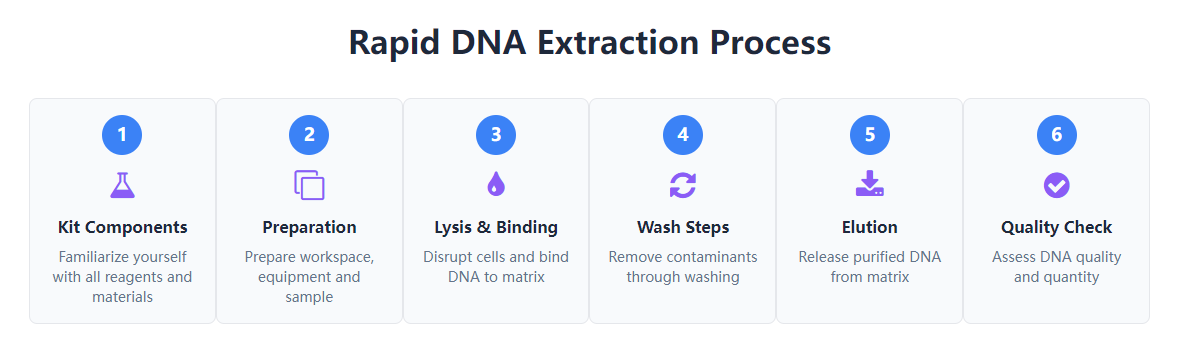
This comprehensive tutorial provides step-by-step guidance for first-time users of rapid DNA extraction kits, covering essential preparation, proper technique, and quality assessment methods. The guide explains the fundamental science behind DNA purification while maintaining focus on practical implementation for educational, research, or personal interest applications. Readers will learn to navigate the extraction process efficiently while understanding the purpose behind each step, enabling successful DNA isolation from various biological samples within approximately ten minutes.
Understanding What's in Your DNA Extraction Kit
Before beginning the extraction process, familiarizing yourself with the kit components ensures smooth workflow execution. Standard rapid DNA extraction kits contain several essential reagents and materials designed to work together in a specific sequence. The lysis buffer serves to break open cells and release DNA, typically containing detergents to disrupt membranes and salts to protect nucleic acids. Binding buffer creates conditions where DNA specifically attaches to the purification matrix while other cellular components remain in solution. Wash buffers remove contaminants through a series of increasingly stringent cleaning steps, and elution buffer finally releases purified DNA into a stable solution.
Physical components include purification columns that contain silica-based membranes which selectively bind DNA, collection tubes that hold liquids during centrifugation, and sometimes specialized reagents for specific sample types. Most kits provide sufficient materials for multiple extractions, though quantities vary by manufacturer and intended application. Proper storage of kit components according to manufacturer recommendations maintains reagent stability and ensures consistent performance. Understanding the role of each component helps troubleshoot potential issues and adapt protocols for specific needs.
Lysis Buffer Composition and Purpose
The lysis buffer represents the first critical reagent in DNA extraction, designed to disrupt cellular and nuclear membranes to release genetic material. This solution typically contains detergents like SDS or Triton that solubilize lipid bilayers by forming micelles around hydrophobic molecules. Chaotropic salts such as guanidine hydrochloride denature proteins and help inactivate nucleases that might degrade DNA. Some formulations include EDTA which chelates magnesium ions required for nuclease activity, providing additional protection for released nucleic acids.
The specific composition varies between kits designed for different sample types, with formulations optimized for plant, animal, or microbial cells reflecting their distinct structural characteristics. Plant-specific kits often include additional components to combat polysaccharides and polyphenols that can interfere with downstream applications. Understanding these compositional differences helps select appropriate kits for specific sample types and explains why universal protocols don't always yield optimal results across all biological materials.
Binding Technology and Matrix Materials
DNA binding represents the purification heart of the extraction process, where nucleic acids selectively adhere to solid supports under specific buffer conditions. Most rapid kits utilize silica-based technology where DNA binds to glass fiber or silica membranes in the presence of high salt concentrations. The binding mechanism relies on chaotropic salts disrupting water structure, allowing DNA to form hydrogen bonds with silica surfaces through salt bridges. This interaction occurs optimally at specific pH ranges, typically between 5.0 and 6.0, where both DNA and silica surfaces exhibit appropriate charge characteristics.
The physical format varies between spin columns containing embedded membranes, magnetic silica particles, or silica bead suspensions. Spin columns represent the most common format for beginner-friendly kits due to their straightforward operation and visual confirmation of liquid flow. Magnetic bead systems offer automation compatibility while silica bead approaches can provide enhanced binding efficiency for challenging samples. Each format employs the same fundamental binding chemistry but implements it through different physical mechanisms with distinct handling requirements.
Wash Buffer Functions and Formulations
Wash buffers systematically remove contaminants through carefully designed chemical compositions that maintain DNA binding while solubilizing impurities. The first wash typically contains salt and ethanol at concentrations that remove proteins, carbohydrates, and other cellular debris while keeping DNA firmly attached to the binding matrix. Subsequent washes often feature higher alcohol concentrations or additional detergents to eliminate more stubborn contaminants including pigments, lipids, or residual salts. The progressive nature of wash buffers ensures comprehensive purification without prematurely eluting the target DNA.
Most kits include two distinct wash buffers with the second wash often containing higher ethanol concentrations, typically 70-80%, to ensure complete removal of salts and other small molecules. Some specialized kits incorporate additional wash steps or specialized buffers for particular sample types, such as inhibitor removal technology for forensic samples or humic acid elimination buffers for soil extracts. Understanding wash buffer progression helps users appreciate the purification logic and explains why skipping or reordering steps compromises final DNA quality.
Elution Buffer Characteristics and Alternatives
Elution buffer serves the final purpose of releasing purified DNA from the binding matrix into an appropriate storage solution. Most elution buffers consist of low-salt solutions like Tris-EDTA or nuclease-free water that disrupt the DNA-silica interaction by rehydrating the binding interface. The low ionic strength eliminates salt bridges that facilitated binding, while slightly alkaline pH (typically 8.0-8.5) helps ensure complete DNA resolubilization. Tris provides buffering capacity while EDTA chelates divalent cations that might activate nucleases during storage.
Elution efficiency depends on multiple factors including buffer composition, temperature, and contact time with the binding matrix. Many protocols recommend heating elution buffer to 65-70°C to enhance DNA recovery, though this must be balanced against potential degradation at elevated temperatures. Some applications may substitute nuclease-free water when EDTA interference concerns exist, though this provides less protection against degradation during storage. Understanding these options enables informed decisions based on specific downstream application requirements.
Preparing Your Workspace and Sample
Proper workspace preparation significantly influences extraction success, beginning with cleaning surfaces with DNA-decontaminating solutions to prevent cross-contamination.
Organize all required equipment including microcentrifuge, vortex mixer, pipettes and tips, heating block if specified, and personal protective equipment. Verify that kit
components are complete and at room temperature unless otherwise specified, as some reagents precipitate when cold. Prepare samples according to kit recommendations, considering
that sample input amounts dramatically impact both yield and purity of extracted DNA.
Sample preparation varies significantly by source material, with liquid samples like blood often requiring pretreatment while solid tissues need homogenization before extraction. Many beginners benefit from practicing with simple samples like buccal cells from cheek swabs or diluted bacterial cultures before progressing to more challenging materials. Accurate sample measurement ensures consistent results, as insufficient starting material yields little DNA while excess material can overwhelm binding capacity. These preparatory steps, though seemingly basic, establish foundations for successful DNA extraction.
Laboratory Safety and Contamination Prevention
Basic laboratory safety practices protect both the user and the integrity of extracted DNA, beginning with appropriate personal protective equipment including gloves and lab coat. Gloves prevent both contamination of samples with user DNA and exposure to chemical reagents, while lab coats protect personal clothing. Workspace decontamination with DNA-eliminating sprays or 10% bleach solutions destroys potential contaminating DNA from previous experiments. Many laboratories designate specific areas for pre-and post-PCR work to prevent amplification product contamination of extraction setups.
Proper waste disposal represents another critical safety consideration, with different containers required for biological waste, chemical waste, and sharp objects. Used columns and tips that contacted biological samples typically require autoclaving or chemical treatment before disposal. Understanding these safety protocols ensures protection while maintaining the integrity of extraction results, particularly important when processing multiple samples or working with potentially infectious materials.
Sample Collection and Preliminary Processing
Sample collection methods directly influence extraction success, with proper technique ensuring adequate cellular material while minimizing contamination. Buccal cell collection using swabs requires firm cheek scraping to dislodge epithelial cells, while blood collection needs appropriate anticoagulants to prevent clotting. Plant samples benefit from quick processing to avoid degradation, while microbial cultures should be harvested during logarithmic growth phase for optimal DNA yield. Each sample type presents unique collection considerations that impact subsequent extraction efficiency.
Preliminary processing prepares samples for extraction, with solid tissues often requiring homogenization through grinding, bead beating, or enzymatic digestion. Liquid samples may need centrifugation to concentrate cells or remove interfering substances. The extent of preliminary processing varies by sample type and kit specifications, with some blood-specific kits including specialized lysis steps for erythrocyte removal. These preparatory measures ensure samples are in optimal condition for the standardized extraction protocol that follows.
Equipment Verification and Calibration
Equipment functionality verification before starting extraction prevents procedural failures, beginning with microcentrifuge operation at appropriate speeds. Most extraction protocols require centrifugation between 6,000-14,000 x g, with higher speeds typically used during binding and washing steps. Vortex mixers should provide consistent agitation for resuspending pellets and mixing reagents, while heating blocks or water baths must maintain stable temperatures for incubation steps. Pipette calibration ensures accurate liquid transfer, particularly critical for small volumes where errors represent significant percentage deviations.
Temperature-sensitive steps require verification that equipment reaches and maintains specified temperatures, with many protocols utilizing 56°C for proteinase K digestion or 65-70°C for elution. Room temperature specifications typically mean 20-25°C, with significant deviations potentially impacting binding efficiency or enzyme activity. These equipment checks, though simple, prevent frustrating failures and ensure the standardized conditions upon which kit performance claims are based.
Reagent Preparation and Storage Considerations
Proper reagent preparation follows manufacturer instructions precisely, noting requirements for ethanol addition to wash buffers or dilution of concentrated stocks. Many kits require adding specified volumes of ethanol or isopropanol to wash buffers before use, with inaccurate preparation compromising purification efficiency. Reconstitution volumes for lyophilized components like proteinase K must measured accurately to ensure correct enzymatic activity. Date tracking of prepared reagents prevents using outdated materials that might have degraded performance.
Storage conditions maintain reagent stability, with most buffers stable at room temperature while enzymes and some specialized reagents require refrigeration or freezing. Alcohol-containing wash buffers typically remain stable at room temperature when properly sealed to prevent evaporation. Understanding storage requirements and expiration dating prevents using compromised reagents that would yield suboptimal results despite proper technique. These preparatory details, though easily overlooked, significantly impact extraction success and reproducibility.
Executing the Lysis and Binding Steps
The lysis and binding phases initiate the actual DNA extraction, beginning with sample introduction to lysis buffer and thorough mixing to ensure complete cellular disruption. Most protocols recommend vortexing or pipette mixing for 10-30 seconds to create homogeneous suspensions, with incomplete mixing leaving intact cells that reduce final DNA yield. Incubation times vary by sample type, with simple samples like buccal cells requiring just minutes while complex tissues may need extended digestion with proteinase K. During this phase, cells rupture to release DNA into solution where it becomes accessible for subsequent purification.
Binding begins with addition of binding buffer to the lysate, creating chemical conditions that promote DNA attachment to the purification matrix. The high salt concentration in binding buffers neutralizes DNA phosphate backbone repulsion from negatively charged silica surfaces, allowing hydrogen bonding to dominate the interaction. Many protocols include a brief incubation period after binding buffer addition to ensure complete interaction before proceeding to separation steps. This phase represents the critical transition where DNA becomes selectively immobilized while contaminants remain in solution.
Sample Lysis Techniques and Optimization
Effective lysis requires complete cellular disruption while preserving DNA integrity, achieved through optimized buffer composition, mechanical assistance, and appropriate incubation conditions. Simple samples like buccal cells or dilute bacterial cultures typically lyse quickly in detergent-containing buffers, while complex samples like plant tissues or gram-positive bacteria may require additional mechanical disruption. Vortexing with abrasive beads, grinding with pestles, or brief sonication can enhance lysis efficiency for challenging samples. Understanding sample characteristics helps determine when standard protocol suffices versus when modifications might improve results.
Incubation temperature significantly influences lysis efficiency, with many protocols recommending 56°C to enhance membrane disruption and proteinase K activity when included. Higher temperatures accelerate lysis but risk DNA fragmentation, while lower temperatures preserve integrity at the cost of extended processing time. Most rapid kits optimize this balance for typical samples, though modifications may benefit unusual materials. Monitoring lysis completeness through visual inspection of clarification or viscosity changes provides feedback for protocol adjustment when processing unfamiliar sample types.
Binding Buffer Addition and Mixing
Binding buffer addition creates chemical conditions that promote selective DNA attachment to the purification matrix, typically requiring precise volumes specified in the protocol. Inaccurate measurement compromises the critical salt and alcohol concentrations required for optimal binding efficiency. Thorough mixing after binding buffer addition ensures homogeneous conditions throughout the solution, with inadequate mixing creating localized zones where binding conditions suboptimal. Most protocols recommend immediate mixing by vortexing or pipetting to prevent precipitate formation before proceeding to the next step.
The binding mixture typically appears cloudy due to precipitated proteins and cellular debris, with this appearance indicating proper reagent interaction. Clear solutions may suggest insufficient cellular material or incorrect buffer preparation. Some protocols include a brief incubation period after mixing to allow complete DNA interaction with binding conditions before separation. This seemingly simple step establishes the foundation for selective purification in subsequent phases.
Matrix Loading and Initial Separation
Loading the binding mixture onto the purification matrix represents the physical separation step where DNA becomes immobilized. For spin column systems, this involves pipetting the entire mixture into the column reservoir, taking care not to touch the membrane with the pipette tip. Magnetic bead systems require adding beads to the mixture and incubating with occasional mixing to allow DNA binding. The loading volume should not exceed column capacity specifications, with overloading potentially compromising binding efficiency and contaminant removal.
Initial separation removes the liquid phase while retaining DNA-bound matrix, accomplished through centrifugation for spin columns or magnetic separation for bead-based systems. Centrifugation speeds typically range from 6,000-14,000 x g for 30-60 seconds, with insufficient force leaving liquid in the column or inadequate pellet formation. Magnetic separation requires sufficient time for complete bead migration, typically 2-5 minutes depending on bead size and magnet strength. This separation represents the first purification step where contaminants begin dissociating from the DNA-matrix complex.
Troubleshooting Common Lysis and Binding Issues
Common lysis and binding problems include incomplete cellular disruption, inefficient DNA binding, or matrix overload, each with distinctive indicators and solutions. Incomplete lysis manifests as low DNA yield despite adequate starting material, often addressed through extended incubation, additional mechanical disruption, or increased temperature. Inefficient binding may result from incorrect binding buffer preparation, inappropriate pH, or insufficient mixing, typically corrected by verifying reagent preparation and technique.
Matrix overload occurs when DNA exceeds binding capacity, resulting in both reduced yield and carryover of contaminants. This situation typically arises with samples having exceptionally high DNA content, requiring reduction of input material or selection of higher-capacity purification formats. Recognizing these common issues enables quick correction and improves success rates, particularly important when processing valuable or irreplaceable samples.
Performing the Wash Steps
Wash steps systematically purify bound DNA through sequential application of solutions that remove contaminants while maintaining DNA-matrix attachment. The first wash typically employs a buffer containing salt and moderate ethanol concentration to eliminate proteins, carbohydrates, and other soluble impurities. Subsequent washes use higher alcohol concentrations to remove residual salts and more stubborn contaminants. Each wash follows a consistent process of adding buffer, mixing or centrifuging to ensure contact with the entire matrix, and removing the liquid waste while retaining the DNA-bound matrix.
Proper execution of wash steps requires careful attention to volumes, incubation times, and complete liquid removal between steps. Inadequate washing leaves contaminants that inhibit downstream applications, while excessive washing may dislodge DNA particularly shorter fragments. Most protocols specify exact wash volumes and centrifugation parameters that have been optimized for the specific matrix and buffer system. Following these specifications precisely ensures optimal purification while maintaining high DNA recovery.
First Wash Implementation and Purpose
The first wash solution typically contains guanidine salts or similar chaotropic agents that maintain DNA binding conditions while solubilizing and removing protein contaminants. This wash often appears colored as it carries away pigments, hemoglobin, or other sample-specific compounds. Complete saturation of the matrix with wash buffer ensures contact with all bound DNA, typically requiring careful application around the entire membrane surface rather than just the center. Inadequate saturation leaves pockets of unwashed contaminants that compromise final purity.
Centrifugation following the first wash should proceed for sufficient time to completely clear the column of liquid, typically 30-60 seconds at recommended forces. Incomplete removal leaves residual wash buffer that dilutes subsequent washes and potentially carries forward contaminants. Many protocols recommend discarding the flow-through immediately after centrifugation to prevent accidental reintroduction of contaminants. This first wash establishes the foundation for high-purity DNA by removing the majority of protein and carbohydrate contaminants.
Second Wash and Final Purification
The second wash typically contains higher alcohol concentrations, usually 70-80% ethanol, which effectively removes salts and residual small molecules while maintaining DNA binding through dehydration of the matrix. This wash solution typically contains no chaotropic salts, transitioning from binding conditions to those that facilitate eventual elution. The ethanol concentration creates conditions where DNA remains insoluble and bound to the matrix while salts and other small molecules dissolve into the wash solution for removal.
Complete ethanol removal after the second wash proves critical, as residual ethanol can inhibit downstream enzymatic reactions. Most protocols include a final empty spin where the column undergoes additional centrifugation after visible liquid has been removed. Some users extend this spin time or increase centrifugation speed to ensure complete drying, though excessive drying can make DNA more difficult to elute. This balance between complete drying and maintained elution efficiency requires following protocol specifications precisely.
Additional Wash Considerations for Specific Samples
Certain sample types benefit from additional or modified wash procedures to address specific contaminant challenges. Plant samples often contain polysaccharides and polyphenols that may require specialized wash buffers or additional wash steps. Forensic samples with potential inhibitor contamination might need inhibitor removal technology washes. Microbial samples from environmental sources often contain complex contaminants that benefit from extended or repeated washing. Understanding sample-specific challenges helps determine when standard protocol suffices versus when modifications might improve results.
Some specialized kits include optional wash steps for particularly challenging applications or provide guidelines for modifying standard protocols for unusual samples. These adaptations typically involve additional wash volumes, extended centrifugation, or specialized wash buffers with enhanced capacity for specific contaminant classes. Recognizing when standard procedures might prove insufficient prevents disappointing results with difficult sample types and guides selection of appropriate specialized kits when regularly processing challenging materials.
Monitoring Wash Effectiveness
Visual inspection during washing provides preliminary feedback about purification progress, with early washes often appearing colored or cloudy while final washes should appear clear. Persistent coloration or cloudiness in later washes may indicate excessive sample input or incomplete previous washes. While not quantitative, these visual cues help identify potential issues before completing the extraction process. Some users document wash appearance as qualitative quality control, particularly when establishing new protocols or processing unfamiliar sample types.
Final DNA purity provides the ultimate assessment of wash effectiveness, typically measured by spectrophotometric ratios where A260/A280 between 1.8-2.0 indicates acceptable protein removal. Significant deviation from this range suggests inadequate washing, with low ratios indicating protein contamination and high ratios suggesting RNA co-purification or other issues. Functional downstream performance ultimately validates wash effectiveness, with successful amplification or other applications confirming sufficient contaminant removal. These assessment methods help refine technique and identify optimal protocols for specific applications.
Completing the Elution Process
Elution represents the final phase where purified DNA releases from the purification matrix into an appropriate storage solution. This process reverses binding conditions through application of low-ionic-strength buffers that rehydrate the DNA-matrix interface. Most protocols recommend applying elution buffer directly to the center of the membrane for spin columns or resuspending magnetic beads in elution solution. Incubation for 1-5 minutes allows diffusion and interaction time, with elevated temperature typically enhancing elution efficiency. The final centrifugation or separation collects DNA in the eluate while retaining the emptied purification matrix.
Elution volume represents a critical consideration balancing concentration needs against complete recovery. Smaller volumes produce more concentrated DNA but may leave significant quantities bound to the matrix, while larger volumes ensure complete recovery but yield more dilute samples. Most protocols recommend elution volumes between 50-200μL, with the optimal choice depending on downstream application requirements and initial sample amount. Some users employ a second elution with fresh buffer to maximize recovery, particularly when working with limited or precious samples.
Elution Buffer Application and Incubation
Proper elution buffer application ensures complete contact with the entire binding matrix, typically requiring careful pipetting directly onto the membrane center for spin columns. Pre-warming elution buffer to 65-70°C significantly enhances DNA recovery by increasing molecular mobility and disrupting hydrogen bonds more effectively. The incubation period allows diffusion throughout the matrix and interaction time for the buffer to displace DNA from binding sites. Extended incubation potentially increases yield but risks DNA degradation, particularly at elevated temperatures.
For magnetic bead systems, resuspension in pre-warmed elution buffer with occasional mixing during incubation ensures complete access to all bead surfaces. The incubation duration typically ranges from 1-5 minutes depending on the specific system and whether elevated temperatures are employed. Incomplete resuspension or inadequate mixing leaves DNA bound to beads, reducing final yield. These technical details significantly influence elution efficiency and represent common optimization points for improving recovery from valuable samples.
Centrifugation and Collection Parameters
Final centrifugation for spin column systems should proceed at standard speeds for sufficient time to completely collect the eluate, typically 30-60 seconds. Inadequate centrifugation leaves significant elution buffer in the column, reducing actual recovery volume and potentially concentrating impurities. Some protocols recommend a brief pulse spin to collect droplets from the column outlet before the main centrifugation. The collected eluate should appear clear, with cloudiness potentially indicating carryover of matrix material or incomplete purification.
Magnetic separation for bead systems requires sufficient time for complete bead migration to the tube wall, typically 2-5 minutes depending on bead size and magnet strength. Careful pipetting of the supernatant avoids disturbing the bead pellet, with angled tube positioning facilitating complete recovery. Some magnetic separation systems incorporate washing steps during separation to enhance purity. These collection techniques ensure maximum recovery of purified DNA while maintaining the separation from the binding matrix.
Storage Conditions and DNA Stability
Proper storage conditions maintain DNA integrity for extended periods, with most protocols recommending short-term storage at 4°C and long-term preservation at -20°C. Repeated freeze-thaw cycles progressively degrade DNA through shearing forces and nuclease activity, making single-use aliquoting advisable for samples intended for multiple applications. Elution buffer composition influences storage stability, with Tris-EDTA providing superior protection compared to water alone by maintaining optimal pH and chelating nuclease cofactors.
DNA concentration and purity assessment before storage verifies extraction success and guides appropriate dilution for downstream applications. Spectrophotometric measurement provides rapid assessment of concentration and purity ratios, while fluorometric methods offer superior specificity particularly for dilute samples. Documentation of extraction details including sample type, date, and quality metrics facilitates future use and troubleshooting. These storage practices ensure extracted DNA remains suitable for its intended applications throughout the experimental timeline.
Troubleshooting Elution Problems
Common elution issues include low yield, poor concentration, or inadequate purity, each with specific causes and solutions. Low yield often results from incomplete cellular lysis, inefficient binding, or insufficient elution conditions, typically addressed through protocol modifications or technique improvement. Poor concentration frequently stems from excessive elution volume or incomplete mixing during incubation, corrected by volume adjustment or technique refinement. Inadequate purity usually indicates insufficient washing or carryover of binding matrix, remedied by additional wash steps or centrifugation adjustment.
Systematic troubleshooting approaches identify specific failure points through process review and comparison with successful extractions. Re-eluting the same matrix with fresh buffer determines whether significant DNA remains bound, indicating inefficient initial elution rather than earlier process failures. Comparison with control extractions using known samples helps distinguish technique problems from sample-specific issues. These methodological approaches efficiently identify and correct elution problems, improving success rates and consistency.
Assessing Your DNA Quality and Yield
Quality assessment verifies extraction success and determines suitability for intended downstream applications, employing multiple complementary methods to evaluate different quality aspects. Spectrophotometric measurement provides rapid assessment of DNA concentration and purity ratios, with A260/A280 between 1.8-2.0 indicating acceptable protein contamination levels. Fluorometric methods using DNA-binding dyes offer superior specificity for quantification, particularly valuable when working with dilute samples or those containing significant RNA. Gel electrophoresis visually assesses DNA integrity and fragment size distribution, especially important for applications requiring high-molecular-weight DNA.
Functional testing through amplification of control targets represents the most relevant quality assessment for many applications, directly evaluating performance in the intended analytical context. Many laboratories establish minimum threshold values for amplification efficiency or cycle threshold values to qualify extracted DNA for specific uses. These comprehensive assessment protocols ensure extracted DNA meets the rigorous requirements of contemporary molecular applications while identifying potential issues before investing in downstream processes.
Spectrophotometric Measurement and Interpretation
Spectrophotometric DNA quantification relies on absorbance at 260nm where each unit corresponds to approximately 50μg/mL for double-stranded DNA. The A260/A280 ratio indicates protein contamination, with values between 1.8-2.0 generally considered acceptable for most applications. The A260/A230 ratio assesses salt or organic compound contamination, with values typically above 2.0 indicating sufficient removal of these inhibitors. Significant deviation from these expected ranges suggests potential issues with extraction quality that might compromise downstream applications.
Spectrophotometric measurement limitations include inability to distinguish between DNA and RNA, potential interference from free nucleotides, and relative insensitivity compared to fluorometric methods. These limitations make spectrophotometry most suitable for initial quality assessment rather than definitive quantification, particularly for samples with expected contamination or those requiring precise concentration measurement. Understanding these constraints ensures appropriate interpretation of spectrophotometric results and guides selection of additional assessment methods when needed.
Fluorometric Quantification Advantages
Fluorometric DNA quantification employing DNA-binding dyes like PicoGreen offers superior specificity and sensitivity compared to spectrophotometric methods, detecting as little as 25pg/mL DNA. This approach specifically measures double-stranded DNA without significant interference from RNA, proteins, or free nucleotides, providing more accurate concentration values. Fluorometric methods require standard curve generation using DNA standards of known concentration, with sample values interpolated from this reference. The increased specificity makes fluorometry particularly valuable when working with complex samples or those requiring precise quantification for sensitive downstream applications.
Modern fluorometers often feature pre-programmed assays for common DNA quantification dyes, simplifying operation and improving reproducibility. The method requires minimal sample volume, typically 1-2μL, conserving valuable extracts for subsequent applications. These advantages make fluorometric quantification the preferred method for many applications requiring accurate DNA concentration values, though the requirement for specialized equipment and reagents represents a limitation for some users.
Gel Electrophoresis for Integrity Assessment
Agarose gel electrophoresis provides visual assessment of DNA integrity through separation by molecular weight, with intact genomic DNA appearing as a high-molecular-weight band near the well. Degraded DNA demonstrates smearing toward lower molecular weights, while RNA contamination appears as a diffuse low-molecular-weight smear. Ethidium bromide or safer fluorescent alternatives intercalate between DNA bases, allowing visualization under UV light. This method provides qualitative rather than quantitative information but offers unique insights into DNA integrity unavailable through other assessment methods.
Electrophoresis conditions influence separation resolution, with lower agarose concentrations (0.6-0.8%) providing better separation of high-molecular-weight DNA while higher concentrations (1.2-2.0%) improve resolution of smaller fragments. Inclusion of DNA size markers enables approximate fragment size estimation, particularly valuable when assessing fragmentation in samples like FFPE tissues or ancient DNA. Though more time-consuming than spectroscopic methods, gel electrophoresis remains invaluable for integrity assessment, especially for applications requiring high-molecular-weight DNA.
Functional Testing for Application Suitability
Functional testing evaluates DNA performance in the intended application, providing the most relevant quality assessment for specific use cases. PCR amplification using control targets verifies absence of inhibitors and adequate template quality, with amplification efficiency and cycle threshold values serving as performance indicators. Restriction digestion assesses DNA purity and compatibility with enzymatic reactions, while transformation efficiency tests evaluate DNA quality for cloning applications. These functional tests directly measure the characteristics most important for successful downstream applications.
Application-specific qualification criteria establish minimum performance thresholds that extracted DNA must meet before proceeding to valuable downstream processes. For diagnostic applications, these criteria might include maximum cycle threshold values for control amplifications or minimum relative fluorescence units in quantification assays. Research applications may establish different criteria based on specific experimental requirements. These functional assessments ensure extracted DNA possesses the necessary characteristics for successful application in intended downstream processes.